Computer Station Nation is reader-supported.
When you buy through links on our site, we may earn an affiliate commission. Learn more.
Most printers die way before they should. Not from hardware failure — from neglect. Clogged heads, dried-out ink, dust in the paper path, ignored firmware. Five to ten minutes of maintenance a month keeps a printer running for years. Here’s exactly what to do.
Table of Contents
- Regular Maintenance Tasks
- Inkjet-Specific Care
- Laser-Specific Care
- Keeping the Paper Path Clean
- Software and Firmware
- Storing a Printer You Don’t Use Often
- FAQ
Regular Maintenance Tasks
These apply to every printer, inkjet or laser.
Dust the exterior and paper tray monthly
Dust gets into the paper path and causes feeding problems. A dry microfiber cloth on the exterior and paper tray once a month is all it takes. Don’t use wet wipes or cleaning sprays on the exterior — moisture near the paper path causes jams and sensor errors.
Use your printer at least once a week (inkjets)
Inkjet nozzles dry out when left idle. The single best maintenance tip for inkjet owners: print something at least once a week, even if it’s just a test page. It keeps ink flowing through the heads and prevents clogs before they start.
If you know you won’t use it for a few weeks, run a nozzle check page before you leave it idle. If the test shows clean output, the heads are fine. If you come back to streaky output, run one head cleaning cycle before printing anything important.
Keep paper in a sealed bag or box when not in use
Paper absorbs moisture from the air. Humid, wavy paper causes jams and uneven print quality. Store unused paper in a sealed bag or its original wrapper, ideally in a room-temperature environment. Don’t stack reams directly on the floor.
Don’t leave paper loaded for weeks at a time
Paper sitting in the tray collects dust and warps slightly. If you’re not printing for more than a week, pull it out and store it properly. Load fresh paper when you’re ready to print again.
Inkjet-Specific Care
Run a nozzle check, not a full cleaning, first
When print quality drops, the instinct is to run a head cleaning cycle. Don’t do that first. Run a nozzle check page instead — most printers have this in the maintenance menu or the companion app. The nozzle check shows exactly which colors have blocked nozzles. If the check shows clean output, the problem is something else (low ink, wrong paper setting, dirty rollers).
Head cleaning cycles use a significant amount of ink. If you run three cleaning cycles and the problem persists, you’re burning through ink without solving anything. Try the nozzle check first, then one cleaning cycle, then check again before repeating.
How to run a print head cleaning
- Open the printer’s companion app or access the printer’s onboard menu
- Navigate to Maintenance or Tools
- Select “Head Cleaning” or “Print Head Cleaning”
- Wait for the cycle to complete (1-3 minutes)
- Print a nozzle check page to verify improvement
- If output is still poor after two cleaning cycles, let the printer rest for 30 minutes before trying again — repeated immediate cycles can overheat the head
Aligning the print heads
If text looks blurry or colors don’t line up properly but the nozzle check shows clean output, the print heads need alignment. This is also in the maintenance menu. Run an alignment, print the alignment page, and scan it or enter the result codes if prompted. Most modern printers do this automatically.
Run a head alignment after installing new cartridges and after any time the printer is moved or bumped.
Storing cartridges properly
If you have spare cartridges, keep them in their sealed packaging at room temperature. Don’t store them near heat sources or in direct sunlight. Unused cartridges in sealed packaging last until the expiry date printed on the package. Once opened, use them within six months.
Laser-Specific Care
Clean the drum and corona wire periodically
Laser printers use a drum unit to transfer toner to paper. Over time, toner residue and dust accumulate. Most laser printers have a cleaning mode accessible from the control panel or app — run this every few months or when you notice streaks or speckling on output.
Some laser printers have a manual corona wire cleaner (a small tab you pull across). If your printer manual mentions this, do it every 10,000 pages or annually.
Handle toner cartridges carefully
Toner is a fine powder. When replacing a cartridge, don’t shake it aggressively or lay it on its side. If toner spills, don’t use a regular vacuum — toner particles are too fine and will pass through regular filters. Use a toner-specific vacuum or blot carefully with a damp cloth.
Fuser maintenance
The fuser is the component that heats toner and fuses it to paper. On most home and small-office laser printers, the fuser is integrated into the drum/toner unit and replaced when that unit is replaced. If you’re getting waxy or smeared output that smears when you touch the page, the fuser may be failing. This is a component replacement, not a cleaning task.
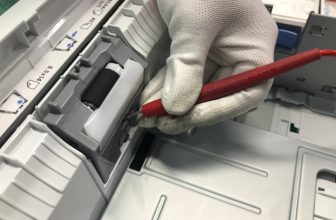
Keeping the Paper Path Clean
Cleaning the rollers
Paper feed rollers pick up dust and paper debris over time. When rollers get dirty, you get repeated misfeed errors and jams. To clean them:
- Power off the printer and unplug it
- Open the paper tray and remove all paper
- Dampen a lint-free cloth with distilled water (not tap water — minerals leave residue)
- Gently wipe the rollers, rotating them manually to clean the full surface
- Let them dry completely before reloading paper and powering back on
Do this if you’re getting regular misfeed errors, or every six months as preventive maintenance.
Clearing paper jams properly
Pull jammed paper out in the direction of paper travel — not backwards. Pulling backwards tears paper and can leave fragments inside the printer. Open every access door the printer has to check for torn scraps. A small piece of paper left inside causes the next jam.
After clearing a jam, run a test page before printing anything important. If the test page jams too, there’s still debris in the path.
Software and Firmware
Keep firmware updated
Printer firmware updates fix bugs, improve wireless reliability, and sometimes improve print quality. Most modern printers update automatically when connected to Wi-Fi, but it’s worth checking manually every few months.
To check: open the companion app and look for a “Firmware Update” or “Printer Update” option in settings. On printers with a control panel, check under Setup or Tools.
One note on HP printers specifically: HP firmware updates have historically changed compatibility with third-party ink cartridges. If you use non-HP ink, review what a firmware update changes before installing it.
Keep the companion app updated
The printer app handles ink monitoring, scan features, and wireless troubleshooting. Outdated app versions can cause connection issues that look like hardware problems but aren’t. Update the app when your phone prompts you.
Storing a Printer You Don’t Use Often
If you’re storing an inkjet for more than a few weeks:
- Run a nozzle check first to confirm heads are clean before storage
- Leave the ink cartridges installed — removing them exposes the print heads to air faster
- Store the printer in a cool, dry place away from direct sunlight
- Cover it with a cloth to keep dust out
- When you bring it back, run a nozzle check before printing anything important. If there are clogs, run one cleaning cycle and check again
For laser printers, storage is less of a concern. They can sit unused for months and fire up clean. Just dust them off and run a test page.
FAQ
How often should I clean my printer?
Light exterior dusting and paper tray cleaning once a month. Roller cleaning every 6 months or when you get misfeed errors. Nozzle checks and head cleanings only when print quality drops — don’t run cleaning cycles on a schedule, they waste ink.
My inkjet prints streaky even after cleaning. What now?
Run the nozzle check to confirm which colors are blocked. Do one more cleaning cycle, wait 30 minutes, and check again. If after two cycles the problem persists, the cartridge itself may be defective or at end of life. Replace it and check again before assuming the print head is damaged.
Can I clean print heads manually?
Yes, but it’s a last resort. Soak a lint-free cloth in distilled water or IPA (isopropyl alcohol, 70% or higher), gently dab the print head contacts — not the nozzles themselves. Let it dry completely. This can revive a head that failed the software cleaning cycles, but risks damage if done aggressively. Try it only after two software cleaning cycles have failed.
How do I know when it’s time to replace the drum on a laser printer?
Most laser printers track drum life and warn you through the control panel or app when it’s low. Common symptoms of a failing drum: consistent streaks in the same position on every page, grey background (ghosting), or speckling that cleaning cycles don’t fix. Replace the drum unit when prompted or when these symptoms appear.
Does paper quality affect printer longevity?
Yes. Low-quality paper sheds paper dust, which builds up on rollers and in the paper path. Using decent 20-24lb copy paper from a known brand reduces this significantly. Cheap generic paper is fine for occasional use; avoid it for high-volume printing.